
Looking for a summery day activity? Check out these easy, colorful summer activities you can try at home!
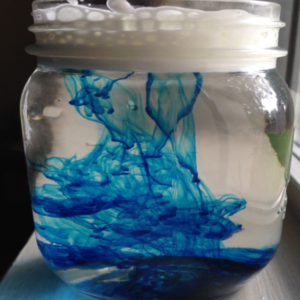
Oil & Ice

Materials:
- Food Coloring
- Ice Tray
- Oil
- Water
- A large bowl or container like a pie pan
Instructions:
- Fill ice tray with water and add food coloring to each cube until color is strong. Let sit in freezer until ice cubes are completely solid.
- Remove ice tray from the freezer, pour oil onto a plate or pan.
- Remove ice from tray and push it around on the pan.
- Enjoy!
Critical Thinking!
What do you see happening?
As the ice begins to melt, does it mix with the oil?
Are there any bubbles or spots?
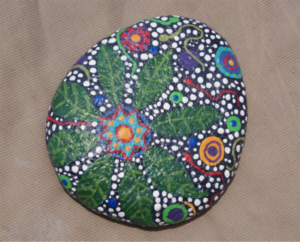
Hot Rock Crayon Art
Materials:
- Rock(s)
- Crayons
- Aluminum Foil
- Access to an oven
- Assistance from an adult
Instructions:
- Go for a walk or hike, find a rock that is large enough to decorate.
- Preheat your oven at 400 degrees, and wrap your rock in aluminum foil.
- Once the oven has finished, place the rocks onto the rack and set a timer for 10 minutes.
- Remove your rocks from the oven and place them on a non-melting surface (like a cooling rack or oven pan).
- Unwrap your rocks and start to draw with crayon, before they cool!
- Enjoy!
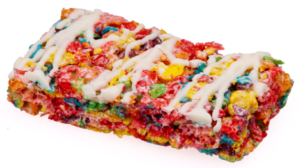
Fruity Pebbles Treat
Materials:
- 9 cups of Fruity Pebbles cereal
- 10 cups of mini marshmallow, divided
- 8 tablespoons of salted butter
- 1 teaspoon of vanilla extract
Instructions:
- Line a 9×13-inch baking dish with parchment paper and set aside.
- Melt the butter in a large pot, once the butter has melted, add in 8 cups of the marshmallows and stir continuously with a wooden spoon or rubber spatula until the marshmallows have melted.
- Remove from heat and add in the cereal, vanilla, and the remaining 2 cups of marshmallows and stir until the cereal is evenly coated.
- Transfer the mixture to the prepared baking dish, spray your hands with non-stick spray and gently press the mixture into the pan, don’t press down too hard or you’ll end up with hard treats. You can also use a second sheet of parchment paper to help press the mixture.
- Allow the treats to cool for about 20 minutes before removing from the pan and slicing into 24 pieces.
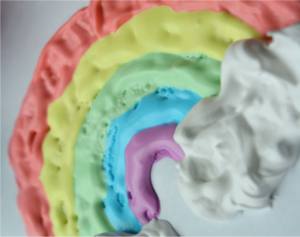
Rainbow Rain
Materials:
- Food Coloring
- Shaving Cream
- Glass/Clear container (a glass cup works best)
- Small cups (size of medicine cups)
- Water
- Eye dropper/ syringe
Instructions:
- Fill small cups with water. Add a different color food coloring to each cup. This will be our “rain”!
- Fill larger container with water, about ¾ filled. Then evenly spray shaving cream over the top surface of the water (Make sure it is layered about the rim of the container). This will be our “clouds”
- Using the eye dropper, drip each color onto the “clouds”.
- Watch as the colors pass through the “clouds”, to make our rainbow “rain”?
Critical Thinking!
The process of the colors passing through the shaving cream is called osmosis. Osmosis (liquid) or diffusion (non-liquid) is when particles pass through a membrane or surface. Can you think of any other situations when diffusion or osmosis takes place?
Microwave Puffy Paint
Materials:
- 1 cup flour
- 3 teaspoons baking powder
- 1 teaspoon salt
- Water; enough to make it thick like pancake batter
- Food coloring
- Paper
- Ziploc baggies
Instructions:
- Mix the dry ingredients together and then slowly add the water to get the right consistency. Mix thoroughly to get out as many lumps as possible.
- Separate the dough into as many color as you make to make. Then add a few drips of color and mix well.
- Put your dough into plastic bags and cut a very small corner through which you will squeeze out your paint onto paper.
- Squeeze the paint out the hole and paint away! Once finished, microwave your creation for about 45 seconds (you may need more or less time, depending on your microwave wattage). Things should be ready when you remove if from the microwave.